
On this page: Learn how to properly setup your DNS records for WP Engine hosting using either a CNAME, ANAME, alias or an A record.
The last step to “go live” with your WP Engine managed WordPress website is to setup DNS records. Pointing DNS allows traffic to come through your new domain and find your WordPress website that is hosted here on our servers. This process of pointing DNS takes place at your DNS host, which is typically where you bought the domain.
There are two methods for pointing your DNS records that work with WP Engine; CNAME or A record. The preferred method is CNAME because we find it be the easiest and the most scalable solution. However, either method will work functionally the same and direct traffic to your site.
NOTE: Before changing your DNS records complete the rest of the Going Live steps!
Locate the DNS Record Values
Configuring a CNAME Record (Preferred)
Configuring DNS Using an A Record (Alternate)
Why is a CNAME Recommended?
LOCATE THE DNS RECORD VALUES
Before you can setup DNS records you will need to know what IP or CNAME value to use.
-
- Login to the User Portal
- Click Sites at the top
- Click on the Environment name you wish to find the IP or CNAME for
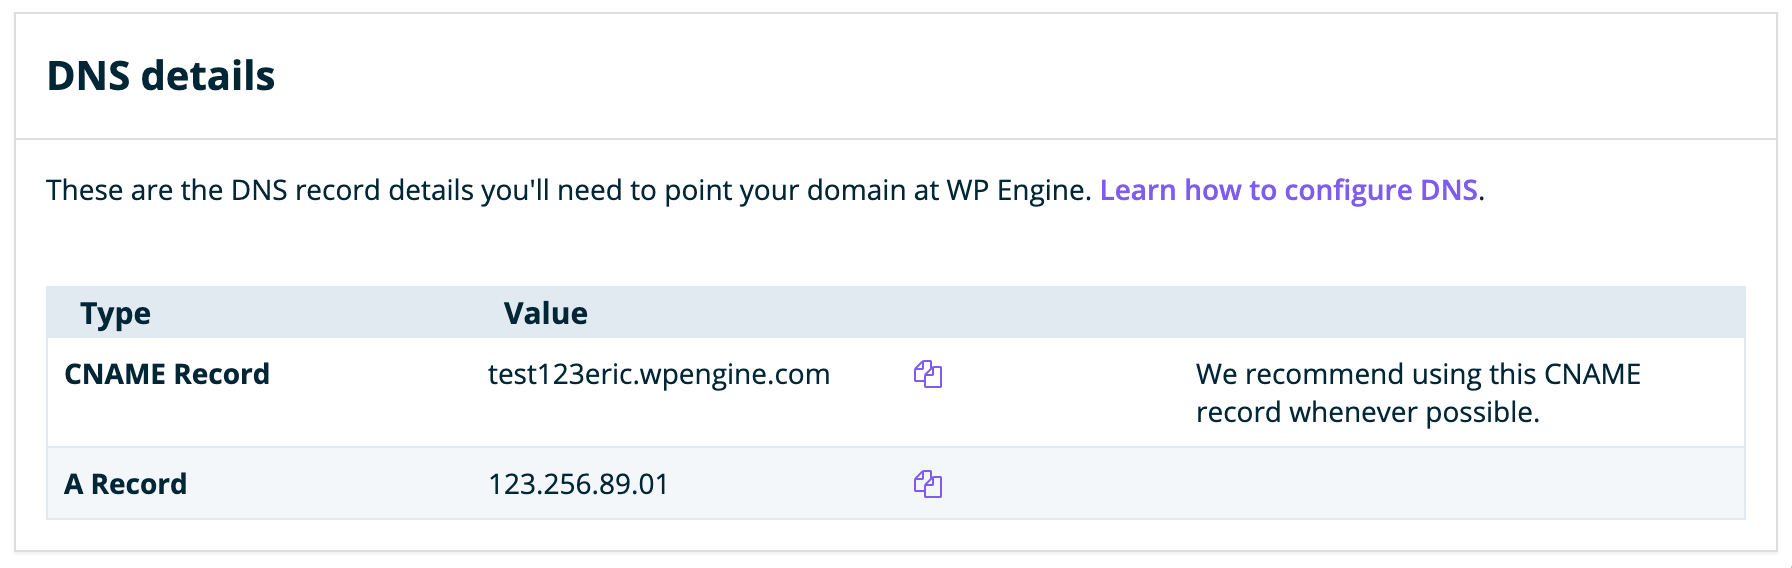
- The values can be located within the DNS Details section
- A Record is your IP address
- CNAME Record is your CNAME, or your WP Engine “default domain”
CNAME VALUE FOR GES
If you are pointing DNS for Global Edge Security (GES), the CNAME you will need to use is located elsewhere.
- Login to the User Portal
- Select Tools
- Locate the environment name you wish to use with GES
- Copy the value in the GES CNAME column

NOTE: Additional methods to locate your IP address can be found here.
CONFIGURING A CNAME RECORD (PREFERRED)
To use a CNAME when pointing your Apex domain (your domain without the www, EX: mydomain.com) there are three easy-to-use options: Cloudflare CNAME, DNSMadeEasy ANAME or DNSimple Alias.
If your website utilizes a subdomain as the primary domain (EX: blog.mydomain.com), a single CNAME record will be sufficient and there is no need to point a second CNAME to @ in this case. The A record can also be left as-is.
(OPTION 1) CLOUDFLARE CNAME
Cloudflare is a service that helps manage your DNS. It has the added benefit of configuring CDN, SSL, and even DDoS protection on some plans.
-
- Sign up for a Cloudflare account
- Enter your domain name when prompted
- Select Next and choose the plan you want (Free is sufficient, but any plan level will work)
- Your existing records will automatically fill in, delete the existing A record
- Click Add Record
- Set the type to CNAME
- Fill in the Name field with:
@ - In the Target field enter your CNAME
- Click Save
- Locate and delete your existing
wwwrecord- It may be either a CNAME or an A record
- Click Add Record
- Set the type to CNAME
- Fill in the Name field with:
www - In the Target field enter your CNAME
- Click Save

- You will be prompted to change your nameservers and Cloudflare will show you two different nameservers values.
- Leave this tab open so you can easily copy and paste them in the next step!
- Login to your DNS host find the area to edit your nameservers.
- Typically, this is in the same area where you manage DNS records
- You may need to select an option to set “custom nameservers”
- Change the nameservers to the two values shown in the Cloudflare pane
- Back in Cloudflare, click Continue
- That’s it! The nameserver and DNS settings may take some time to change over on their own from here.
- You can track propagation of your DNS changes on a site like this.
NOTE: Updating the Nameservers for your domain will affect all records associated with it, including email addresses. Be sure to work with your email host to copy over any extra DNS records into Cloudflare. Learn how to add other records to Cloudflare.
Cloudflare offers many services and options so be sure to set them up properly. Learn more about Cloudflare in our Best Practices guide.
(OPTION 2) DNSMADEEASY ANAME
DNSMadeEasy is a DNS management service to which you would also point your nameservers with similar steps to Cloudflare, above. However, instead of setting a CNAME record with DNSMadeEasy, you will add an ANAME record.
- Login to DNSMadeEasy
- Select your Domain
- Locate ANAME Records
- Click + to add a new ANAME record
- Leave the Name field blank
- Enter your CNAME in the Resolves from box
- Set a TTL (time in seconds for the change to take effect)
- Click Submit to save
- Click + again to add another ANAME record
- Enter
wwwin the Name field - Enter your CNAME in the Resolves from box
- Click Submit to save
View full instructions from DNSMadeEasy.
(OPTION 3) DNSIMPLE ALIAS
If you use DNSimple as your DNS host, you may set an Alias record, which behaves similarly to CNAME but works on root domains (like mydomain.com).
- Login to DNSimple
- Click Domains
- Select your domain name
- Click DNS
- Click Add Record
- Select Alias
- Leave the Name field blank
- Set the Value field to your CNAME
- Choose your TTL (time for the change to take effect)
- Click Add Record to save
- Click Add Record again to add a second record
- Select CNAME
- Enter
wwwin the Name field - Set the Value to your CNAME
- Click Add Record to save
View full DNS configuration instructions from DNSimple.
CONFIGURING DNS USING AN A RECORD (ALTERNATE)
Pointing your A record to your static WP Engine IP will work just fine, but you will need to update your DNS records if your website is ever migrated to a new server while your website hosted with us.
Once you retrieve the IP address value, login to your DNS host. This is most often the Registrar where you purchased the domain. If you are not sure who your DNS host is search for your domain on WHOIs.
We’ve created separate guides for the most common DNS hosts:
- Godaddy
- 1&1
- NameCheap
- Google Domains
- HostGator
- NetRegistry
- Bluehost
- Register.com (RCOM)
- Amazon Route53
- Dreamhost
If your DNS Host is not included above login to your DNS host’s dashboard and locate the area to manage DNS records. Your existing records will look similar to this:

- Edit the A record named “@” and change the “Value” to your WP Engine IP address.
- This is the value for your root domain, or non-www.
- If your DNS host lets you modify the TTL (Time To Live) value, set it as low as possible. This makes the update propagate more quickly.
- Now check the “www” record:
- If it points to “@” then no further changes are needed.
- If it points to a CNAME or IP address, make sure to edit them to the correct WP Engine DNS record value.
WHY IS CNAME RECOMMENDED?
You may be wondering why it would be recommended to use CNAME when A records are standard with most other hosts. In the long run we’ve found CNAME to be the best option- simply set it and forget it.
- When configuring DNS using an A record, your domain is pointed to a singular, static IP address number. If you are pointed with an A record then records must be manually updated at your DNS host for any changes, or the site will go down.
- When configuring DNS using CNAME, your domain is mapped to “yourenvironment.wpengine.com”. This CNAME WP Engine controls all the DNS for, essentially making the DNS for your custom domain dynamic.
As a managed WordPress host, we may migrate your site to another server either by request or in an emergency. While migrations are rare, it’s important to understand how this possibility could impact your peace of mind down the road.
After a migration, the WP Engine system automatically sets up a proxy for your site. If a visitor requests the old server IP for your domain, the proxy sends traffic to your new IP. While it will keep your site up temporarily, this proxy can eventually cause issues.
Potential issues if DNS is not updated after a migration:
- Proxy interferes with secure HTTPS status of your website. The IP your domain points to and the IP your SSL files live on must match.
- Break frontend services and APIs that require the IP be consistent.
- Proxy impacts performance by adding a DNS “hop”.
- The proxy expires after 14 days and your website goes down.
NOTE: If you’re still not ready to set a CNAME up now though, that’s okay. You can come back and do it later anytime!
NEXT STEP: ORDER AN SSL